
 |
| You like blogs? I put a blog in my blog. Inception. |
I got an email about how bloggers made those "About" graphics for the sidebar in their blogs. I am not a graphic designer, nor do I play one on TV. But I thought I would out together a tutorial for people who want to add one of these pics to their blog. To make mine, I used a graphic imaging software called GIMP. If you have some time and want a new hobby, I would learn how to use it (or Photoshop if you can afford it ;-)) This tutorial will show you how to use two free programs to make a graphic like the one on my blog.
For this tutorial, you will need access to a graphic editing software, we'll use Pic Monkey because its free and easy to use. The other program you will need is MS Paint or a similar program. Paint come with Windows an is in the accessories part of your programs menu.
Step 1: Go to the Pic Monkey website, and upload your image for editing.

This is the image I started with. You will want to crop and change your image to suit your graphic. All the tools to edit your photo are in the sidebar of the Pic Monkey program. Have fun with it!

I have a thing for Polaroids, so I added a frame to my pic.

You can use Pic Monkey to add graphics to your photo. I added an arrow.

You can add some text to the picture at this point. When you are finished editing, save the image to your computer. I always save images for internet use as .PNG

Resize the image to fit in your sidebar.

When you finish editing, this is what will be saved to your computer.

Step 2: Open MS Paint to ad text.

Step 3: Write your text

You can change the size and color of your text by using the text toolbar.

Once you have finished your text, and you like the look of your graphic, save it!

Now you should have a picture that looks like this:

In the Blogger bar click on design, and choose layout. your layout should look like this. You will add a gadget to the sidebar where you want your graphic.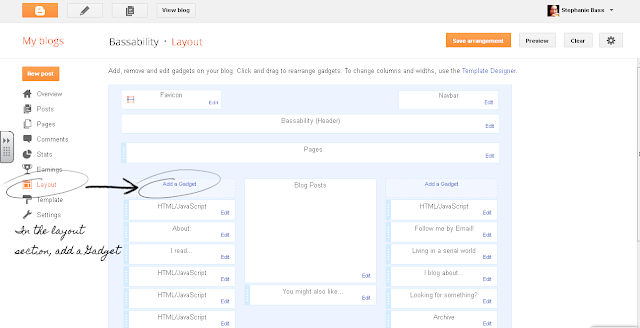

Because you saved your "About" graphic and text as a picture, you only need to add a picture box.

Upload your graphic. The Blogger platform will do the rest. Note: To have a title for your graphic, you can add a title to the title box. I called mine "About" because I'm completely original. Also, because you already resized your graphic, make sure that the box marked "shrink image to size" is unchecked. Otherwise it will make you graphic smaller than you want. *Groan, did I spell "will" wrong in the picture? Do me a favor and ignore that, ok?
 When you view your blog, your "About" picture should be in your sidebar, just like it should! Take a break and marvel at your new graphik dezign skillz (I meant to spell that wrong.)
I hope you find this tutorial helpful! If you use it to make a graphic, link it up so that I can see it, and ooh and ahh over how pretty it is.

This comment has been removed by a blog administrator.
ReplyDeleteIt is very informative post.Thanks for contributing your important time to post such an interesting & useful collection.It would be knowledgeable & resources are always of great need to everyone. Please keep continue sharing.
ReplyDeleteClipping path service India