Showing posts with label Up-Cycled. Show all posts

Friday, 24 August 2012

Made: Paint Chip Matchbook Notebook


I am always looking for a piece of paper or my notebook to jot something down.  I have a lot of ideas for blogging and such when I'm out on the open road.  But I don't carry my usual notebook everywhere because it is much too big and heavy.  So, I made these little notebooks out of some paint chips I had laying around.  I can throw them into my bag, no matter how small, and I always have somewhere to write ideas.  They are very handy, and super easy to make. 


What you need:
  • paint chip- I think these are from Walmart, they are for CIL brand paint, but any paint chips will do; it would just change the size and shape of your book.
  • Stapler
  • Paper, I used scrap paper
  • scissors- I used a rotary cutter; it made things much easier.
  • ruler
  • clear tape (optional)
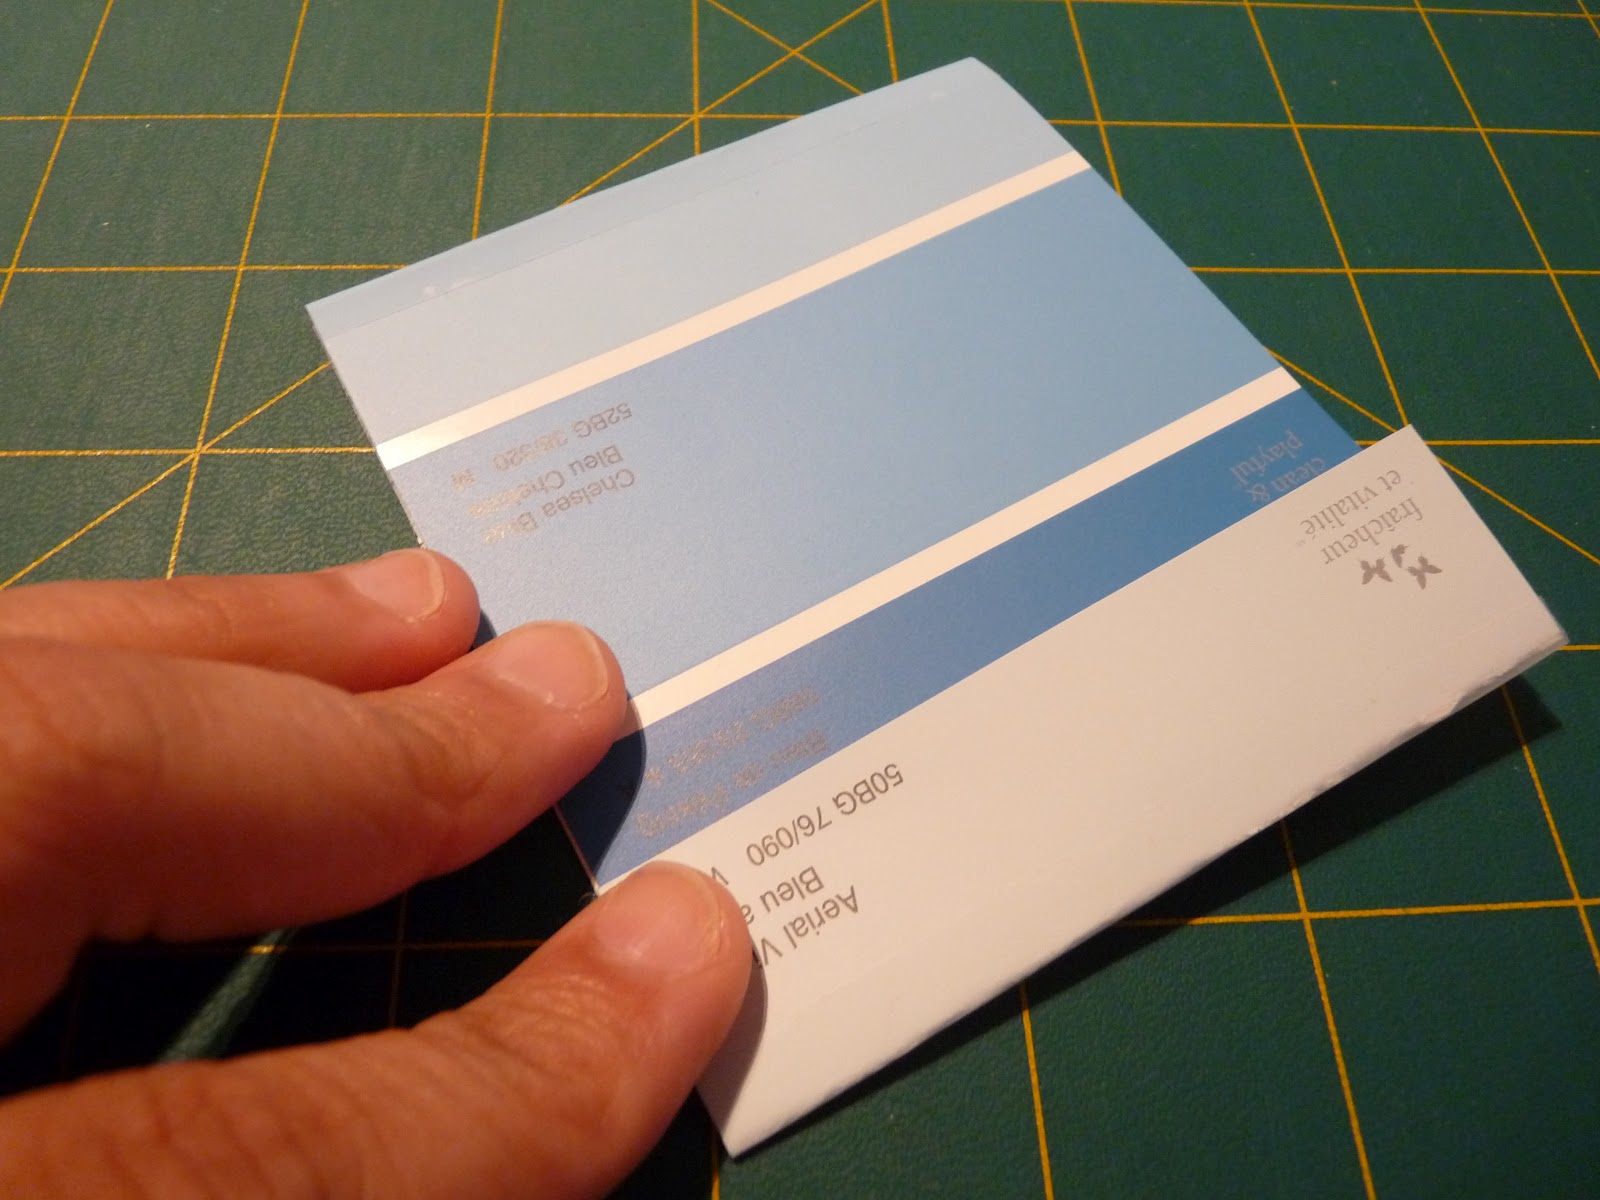
Fold your paint chip into three like a match book.  My dimensions were, 8.5 cm for the top section, 9.5 cm for the middle section and 2.5 cm for the flap.  I creased it well, and cover the fold with clear tape to reinforce them.  But that's totally optional.


Then it will look like a big matchbook.
 

Next, cut your paper the length and width minus a 1/2 cenitmeter of the entire paint chip.  You are going to fold the stack of paper in half to make the pages of your notebook.
 

I forgot to take a picture of the next part, but its easy.  Take the folded edge of your pages, and tuck them under the 2.5 cm flap.  Staple once or twice like a matchbook.  The fold should be under the flap so that you can flip the pages.


And there you have it!  A little notebook!


If you are anything like me, you made 6 and threw them in all of your bags.


What is your notebook solution?  Do you carry one?  Do you just grin and bear the extra weight? 


Friday, 17 August 2012

DIY Week: Mason Jar Soap Dispenser


Are you sick of DIY Week yet?  There are only a couple more projects to go!  Today's DIY makes use of those awesome Mason jars again.  I like to make jam and pickles in the summer, and so sometimes I go hog wild buying jars.  Around this time of the year, they are pretty cheap so we buy a bunch in different sizes.  Whatever I don't use for canning I can use in the future, or for little projects like this one.

I make my own dish soap, hand soap and (hopefully soon) I will be learning to make my own lotions.  I don't mind storing these in a regular jar, but I also like to have the convenience of a pump container for these products.  So I figured out how to re-use an old pump dispenser from a plastic bottle with one of my mason jars.  The process is pretty simple and quick.  So if you have an old bottle that you want to up-cycle, this is something you can try.

The first thing you have to do it drill a hole into the lid of your jar.  I use my 3/8 bit and drilled a big hole as close to the center as I could.  Then I used some needle nose pliers to bend the sides of the hole inwards to make the hole big enough to accommodate the straw holder part of the pump.


I know that hole doesn't look pretty, but you don't see it, so don't worry about that.  After it is just big enough for the pump, stick the pump through.  I put a little hot glue around the top of the hole to seal it and protect it from rusting before I push the pump through.


The lid should be sitting on top of the lid, but the bottom part of the pump should be nice an snug in the hole.  You could use it like this if you'd like.  But I like my pump to be a little more secure, and a little more waterproof.  So, I used my handy hot glue gun to seal the underside of the pump.


The hot glue works really well sealing the holes around the pump.  And I use a brand of glue that is non-toxic.  I have thought about using other glues or caulking, but this one works great, so if it ain't broke...  Let the glue cool and harden, then put your jar together.  I like this because the jar is easy to refill; I get to reuse a part of waste that is not easily recycled, and I get so see the products inside the jar.  Sometimes when I make dish soap, I put a sprig of rosemary in for aroma and to make it look pretty for my kitchen.  I should go and make some dish soap now!


You could use this jar for other purposes too.  I use them to buy refills of products that come in bulk (like my current lotion) and then I switch in the pump top once I get the products home.  It is really handy to have some of these tops laying around, just in case you need a container.  So don't throw away those pumps!  Reuse them over and over again.  If it breaks, peel away the glue, replace and recycle the pump and start again! 

Only 1 more day of DIY Week left!
 Every day of this week I shared a new DIY project.  To review the tutorials, you can click on the tutorial tab at the top of the page, or the tag DIY Week under the posts.
  I hope you find them useful!


Monday, 13 August 2012

DIY Week: Mason Jar Tumblers


This week I've been completing the DIY projects that I've had on my list for a long time.  This is one project that I thought was so useful, and since my cold drink tumbler broke this summer (sad face), I decided there was no time like the present.

I take a smoothie to work every morning; instead of waking up 20 mins earlier, I would rather drink my breakfast on the go.  So I had been using a plastic tumbler that I bought, and it was great, but it broke.  That is probably for the best since it probably wasn't BPA-free.  I didn't think that mattered since I would only have cold drinks in it, but D said that didn't matter.  I tried to do some research, but all the resources supported his claim, and I decided that none of those resources could be considered credible.

ANYWAYS, instead of fighting him on this, I said that I would use a glass jar to take my smoothies in.  But the jars are not so good "on-the-go" you know?  I like to drink my breakfast and drive, and a mason jar is not so conducive to that.  I saw the mason jar tumblers at a friends wedding, and I thought it was such a good idea.  She got them on Etsy, so I looked around.  I wasn't too keen to pay $14.00 for a jar when I had jars at home, so I decided to make it myself.  It wasn't hard.  Here's what you need:
  • a mason jar with lid and screw on band
  • a drill with a 3/8 drill bit
  • some needle nose pliers
  • a little beeswax (optional, but totally helpful)
  • and some 1/4" rubber hole grommets.  In Canada, they come in packages like this:

These rubber hole grommets are usually for electrical work, they are used to protect wires when you drill through metal.  I used them to protect my straw from the metal lid.  This six pack cost me $3.50, and I can make 6 tumblers out of them.   I bought them at Home Depot, but any hardware and building store should have them.  You just need to know what to ask for. ;-)

To put the tumbler together, the steps are pretty easy:
  • Wash your jars, lids and grommets.  
  • Mark on the lid where you want to hole to go.  Drill hole.  Make sure you get all the little metal shavings off the lid.
  • Use pliers to push down the sharp edges left by the drilling.  (important so you don't tear the grommet.)
  • (Optional) rub a little beeswax around the hole.  Since you are drilling through metal, if you don't treat it it will rust.  The wax slows that down, and it edible.  Unless you are allergic to bees.  If you have a bee allergy, I'm not sure what else you could use... Soy wax maybe?)  
  • Pop your grommet through the hole.  
  • I wash the lid again, just to make sure that I got all those little metal shavings off.  
And that's all there is to it. Sip and enjoy.


There is still more DIY week!  
 Every day I will be sharing a new DIY project.  I hope you find them useful!


Tuesday, 7 August 2012

DIY: "Porcelain" Mason Jars

From RealSimple.com
I really wanted these porcelain mason jars.  I think they are so clean looking, and classic.  However, I do not have 50 each for a vase.  If you do, totally support Alyssa Ettinger, get one so can drool over.

But, if like me, you can't afford such beautiful things, you can try and make a substitute until you can buy one for yourself.


I made these very easily.  They are not porcelain, they are painted glass, but they look porcelain-y.

You need:

  • Old mason jars in different sizes, I used some that didn't have lids.  They were going to be garbage!
  • Matte white enamel spray paint, I got mine at Home Depot for $3
  • newspaper
  • a place to spray paint, preferably outside
 

Set out your newspaper, and make sure that you have a picture of Joesph Gordon-Levitt to counter the HUGE picture of Bob Saget looking at you.  Yikes.  Make sure that your glass jars are clean and dry.  They have to be dry or else the paint won't stick.  Also make sure you are using enamel spray paint so it will stick to the glass.  Glass isn't porous, so you need to use the heavy-duty enamel paint.


Paint your jars, make sure that you paint the jars in layers, otherwise you will have pooling and dripping on your jars, and they won't look like porcelain.  My jars took 4 layers, and I let the jars dry for 2-3 hours in between the paint layers.  If that big picture of Bob Saget is still creeping you out, just put a little spray of paint over it.  Bad man all gone.

After the jars are covered and dry, you will need to turn them over and do a quick spray around the mouth of the jar to cover the part that the jar was resting on.  Then, after they dry, they should look like this:


 I didn't have to paint the inside, so it is easy to wash out.  These are no dishwasher safe, nor are they ok for food or drink usage.  I use mine as a vase.  They are empty right now, because I am waiting for a certain someone to notice that flowers are needed...
 

Friday, 3 August 2012

DIY Fake Washi Tape


That washi tape stuff is EVERYWHERE.   I really think that it is cute, and I love to use it in my mixed media stuff and in my art journal.  The down side for me, is its a bit pricey for my budget these days.  If I could afford it, I would buy all the tape! 

So I had the bright idea to make "Fake Washi Tape."  Its not the real thing, but I still like it.  This is not an original idea by any means; but I did it by using what I had already.  Many crafty-types have this stuff around the house anyways, so instead of going out and buying some contact paper, check and see if you have these materials and make a little batch of " washi-style" tape for yourself.


Materials:

  • Colored papers, I used scrapbooking papers and some Christmas wrapping paper I had hoarded left over.
  • Double sided tape; I got 3 rolls for a dollar at the dollar store.  For the four kinds I made, I used under a roll, and I had 8 feet of "washi" tape.
  • Ruler; or any straight edge.
  • Rotary cutter or scissors; the rotary cutter is super easy and fast.  I use an old quilting rotary cutter for paper.
  • Cutting mat; totes optional.  I happen to like my table.
This is so easy, I'm a little embarrassed to call it a tutorial.   I took some paper, I stuck it to one side of the double sided tape, then I rolled it up to be used later.  That's pretty much it. 


Rolling and cutting was pretty zen.  It got frustrating when the paper didn't line up to the edge (use that ruler!) but it usually sorted itself out.


When you need it, just rip of a piece, and peel the backing and stick it like tape.  I just think its prettier.


Friday, 27 July 2012

New Uses for Old Things: Tissue Boxes


I. Am. A. Genius.  I was looking for ways to corral my plastic bag situation.  I collect bags.  I have tons of them.  I don't have it in me to throw them away, especially since they cost me money.  And, I mostly feel ashamed when I forget my reusable bags in the car, and have to buy another one.  AND, I don't want them to end up in a landfill, since our city doesn't recycle all plastic bags.  AND, I want to try weaving with them like I saw at that craft fair.  AND, I'm a bit of hoarder of these things.

ANYWAYS, I needed somewhere to hold them because D was threatening to throw them away.  So I pulled out some tissue boxes from the trash, and voila! plastic bag holders, that take up so little space under the sink it is not even a problem anymore.


You can pull them out one at a time too.  So handy.  And now I'm re-using two things from the bin.   I think I might decorate my bag boxes too.  That sounds like something I would do.

Like I said, I'm a genius.  And modest, it would seem.


Friday, 3 February 2012

Upcycled hankies

Lovely hand-stitched goodies.
My friend Julie read about a jewelry sale in the newspaper.  A group of women in a church group were selling their old jewelry!  For a crafty gal like me, I couldn't just not go. We went and the sale was small, but there was some fun stuff.  Some costumey stuff that I didn't have many ideas for. What caught my eye were the hand-embroidered hankies and napkins.

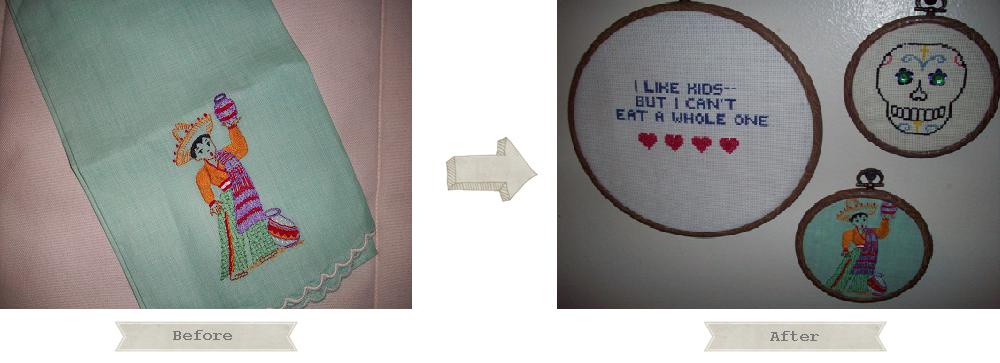
There were lots of napkins and hankies that had lost their set, and they were so cheap.  I bought this one for 10 cents.  I loved him!  He's such a cheerful little dude.

Click on the picture to make it bigger.

...So I up-cycled it into some embroidery art for my cross stitch wall!  He's chilling below my Dia de los Muertos cross stitch, and my position on children.  This hankie even inspired to do another cross stitch.