Monday, 30 March 2020

Made: Magazine file-style box


Let's make something!  I'm stuck at my place, self-isolating and wanted to do some organizing.  Can't go out to buy containers, so, like any good crafter I made one!  This one is much better than what I would buy; where would I find a taco box anyways?

I recorded a video for the method I used to make this box, but I zoomed past the materials and measurements, so here they are:

Materials needed:

(A kit for this project is available at www.thecraftershub.ca)
  • 2 pieces of 12 x 12" medium-to-heavyweight chipboard or 4 pieces 8.5 x 11" to make the same size box I made in the video (you can use cereal boxes in a double layer, or cardboard, or if you are in the GTA you can order from here )
  • 2 12 x 12" pieces of solid coloured card stock (any paper will work though-  If its thin, you will need some tape to help strengthen your corners)
  • 1 sheet 12 x 12" design paper (You can use anything here too: wrapping paper, construction paper, paint, a gift bag- something you like the look of)
  • Scissors, craft knife or paper trimmer (something to cut with)
  • Thick glue (any white glue should work, I use Tacky glue from the Dollar Tree)
  • A ruler
  • A pencil

Measurements:


From the chipboard:

  • 2 pieces cut 9" x 7" (22.9 cm x 17.8 cm) for the front and back (to cut the slope: measure 2 inches or 5 cm in from the top left corner and mark with pencil.  Measure 4" or 10 cm from the bottom right of the panel and mark it.  Connect the dots with a diagonal line and cut on that line.
  • 1 piece cut 9" x 2"22.9 cm x 5 cm) for the spine of the box
  • 1 piece cut 7" x 2" (17.8 cm x 5 cm) for the bottom of the box 
  • 1 piece cut 4" x 2" (10 cm x 5 cm) for the front of the box

From the solid paper (for the gussets):

  • 2 strips of card stock or paper 9" x 2" (22.9 cm x 5 cm)
  • 2 strips of card stock or paper 7" x 2" (17.8 cm x 5 cm)
  • 2 strips of card stock or paper 4" x 2" (10 cm x 5 cm)
  • 2 strips of card stock or paper 2" x 2" (5 cm x 5 cm)

From the designer paper (what ever you are using to decorate the box with):

  • 2 pieces cut 9" x 7" (22.9 cm x 17.8 cm) or if you want a border you can substrate 1/2" (1.3 cm from all measurements) )for the front and back (to cut the slope: measure 2 inches or 5 cm in from the top left corner and mark with pencil.  Measure 4" or 10 cm from the bottom right of the panel and mark it.  Connect the dots with a diagonal line and cut on that line.
  • 1 piece cut 9" x 2"22.9 cm x 5 cm) for the spine of the box
  • 1 piece cut 7" x 2" (17.8 cm x 5 cm) for the bottom of the box 
  • 1 piece cut 4" x 2" (10 cm x 5 cm) for the front of the box


And to put it all together, here's the video!


I would love to know how yours turned out!  Let me know in the comments below!


Thursday, 26 July 2018

I'm back. Seriously.


So, I thought I was done with blogging.  So I took a break.  A looooong break.

But I kind of missed it.  I think I felt too burdened with having to come up with something every few days to post.  And that was stressful.  How do you be/ do something interesting everyday?  Some people can. That's cool.  But, I can't.  Some days work is terrible.  And all I want to do is have a nap.  Now I'm back, and changed a few things.

I'm going to blog about anything I want to.  No boxes, no niches.  Just a weblog.  An online journal.  About my (many) hobbies; about my thoughts, my run ins with positive and negative people... Anything.  I'm done thinking of this as a product.  More of a diary.  It's about the journey, right?

And I think this should be fun.  So, here we go again.

Monday, 19 January 2015

Handmade gifts 2014

Since Christmas is over, and I finally gave out all my gifts, I wanted to post the handmade gifts that I gave out this year.

Every year, I give my friends and family at least one handmade gift.  Last year I knitted cabled head bands and hats for everyone.  The year before I gave personalized gingerbread people.  This year, I left things a little late, and made two quick, but useful gifts for the peeps in my life.


The first gift I made was some beard oil for my D.  I made the labels to and put them onto a recycled bottle.  This is the easiest stuff to make:  3 Tbsp of Sweet Almond Oil; 2 Tbsp of Jojoba oil; 1 tsp of Seabuckthorn Oil;  and 2-3 drops of Tea Tree essential oil and 1 drops of Sandalwood essential oil.  (Note:  This is not a great recipe for people with nut allergies.  Use Olive Oil, and light Castor Oil instead of Almond and Jojoba!)  D loves it.  He uses it once a week.  And he laughs each time he sees the label. 


The gift I made for my lady friends was a stamped clay ring dish which I packaged with some hand salve.  I found the DIY tutorial at this great blog

There was some trial and error on this one though.  I found that the best ink for this project was "archival" inks, and the brand that worked best for me was Colorbox.  The other ink pads I used faded and weren't as vivid once the clay dried.  For others i didn't used any ink at all!  I just stamped them nice and hard so that the impression came through.  I liked these ones the best.  I added some gold leaf paint to the edges to make them a little more fancy.   They were a hit with my pals.

Did you make any gifts this holiday? 


Friday, 2 January 2015

The best thing this year so far...


Hi friends. I know, it's been a while. There was a lot going on, and I never found the energy to do much, let alone blog about it.  And I just couldn't bring myself to start a blog series called, "From my couch" so, a took a break.  The truth is, I started a new job, and threw myself into that (as you do) and  and, and.  The break was just what I needed. I feel refreshed, and I came back to look at me blog, and thought to myself , "I like this blog." Which is good. Because it's mine. I'm still not going to have a very active posting schedule, I think mostly on the weekends since that's when I do the fun stuff, so if you stuck with me this long, I hope you won't mind the lighter postings. Yous are good people though, so I think we will be fine.

On with the post!

That's quite a title for the second day of the year. But this twitter hashtag was the best New Years thing I have seen.  It started with this lady:


And soon, I had to get in on the action. Here are some of my most retweeted ones:


Which I think are just hilarious.  Yes, I laugh at my own jokes. Doesn't everybody?


Wednesday, 20 August 2014

Peach Season


The summer is awesome for those of us who live in the region called the Niagara Green Belt!  We live in a temperate area where there are so many orchards and farms of all types.  And at this time of the year is my favorite fruit harvest-- peaches!

Remember this gem?


That doesn't really have anything to do with this other than its a song about my favorite fruit that I sing when I'm eating peaches.  And now, hopefully you will too.

ANYWAYS, the point of this post was to implore you to roast and/ or grill your peaches.  They are so yummy raw, but roasting them ups your game!

The picture above is of a peach roasted in the oven, with ice cream and a yummy pecan mush.  I'm southern so I eat pecans on EVERYTHING.

To roast your peaches:
  1. Wash then cut your peaches in half and remove the stone.
  2. Put your peaches into an oven safe baking dish 
  3. Roast/ Bake your peaches at 350 for an hour or so.  They are finished when they are soft and juicy and the skin on the edge of the cut has curled slightly.  
There you go.  Eat them as dessert by themselves.  Or you can add ice cream and a yummy nut mush.

Yummy Nut Mush:
1/2 cup of pecans (walnuts work too)
2 tbsp soft butter (I used Earth Balance which was great)
2 tbsp of brown sugar

Add all ingredients to food processor and pulse until it comes together.  Serve a spoonful with your roasted peaches and ice cream and enjoy.

Seriously, roasting these peaches changed my life.


Monday, 18 August 2014

My Kijiji skills are strong


For 2 years-- 670 days-- I have been looking for a kilim rug.  It's not that I couldn't find one, I found many I love at prices I did not love.  I'm not cheap, per se; I like the word the French use economisee.  I couldn't justify to my wallet (or my partner) spending more than 600 dollars on a rug. But after a year of stalking eBay and kijiji, I found one!  And at a really good deal, probably too good...

ANYWAYS, I contacted the seller and drove an hour to pick it up and after a good vacuuming and a quick clean, it ended up in my dining nook.

And I love it.


Friday, 15 August 2014

Made: Woven Wall Hanging

From: Creative Bug BlogA Beautiful MessA Pair and a Spare

Usually, I'm slow to notice trends.  I don't read about them, and usually I don't really care.  I like what I like, you know?  But if there's a trend that centered around a DIY, I'm there.  I love when I figure that out.  and that's what I fell about this trend of woven wall hangings.

I am seeing them EVERYWHERE.  I couldn't read a DIY blog without it popping up, y'all.  And the more I saw them, the more I wanted one.  So, I decided to try my hand at one.  I've woven before, but now I don't have a loom.  I've meant to buy a new one, but never think of it when I have the money-- and there's a new Fossil Store in my town, and other things and places I wanted to go and things I wanted to do.  So I never bought one.  But that didn't stop me!  I made this:


...using yarn and some cardboard! 


That's the best part about weaving-- you can use almost anything and weave.  If you want a full tutorial on the process of weaving little wall hanging, A Beautiful Mess has a great one here.  If you don't own a loom (and don't want to buy one) you can substitute a piece of corrugated cardboard at least as big as you want your hanging.  Then cut some notches in the top and bottom (directly across from each other) to weave your warp onto.  Then you can follow the tutorial as written. 

The good thing about using cardboard instead of a loom, is that you can draw a guide for your image onto the cardboard.  That way you don't have to wing it.  I wanted some triangles in the "Flying Geese" pattern I love on quilts. (Note: The link leads you to a page about the Underground Railway "Quilt Codes."  I don't want to hear about how the theory of the quilt codes were "disproved."  I like the story, whether true or not.  It speaks to the ingenuity of the slaves and their allies while trying to escape an unjust system.)  So I wanted some version of it for my wall.


I used some neutral wool, and some Noro yarn for the triangles, a Japanese wool with awesome colors.  The weaving was really fast!  I finished it in one day.  I started it in the morning with my coffee, and finished it while I was watching Arrow.  I held the yarn double for the weft to make it thicker.  I like how it looks.

    
I hope you give it a try!  It was a satisfying DIY with a great end product.  If you do try it, make sure to link back so I can see it too!


Wednesday, 13 August 2014

My Favorite Iced Tea


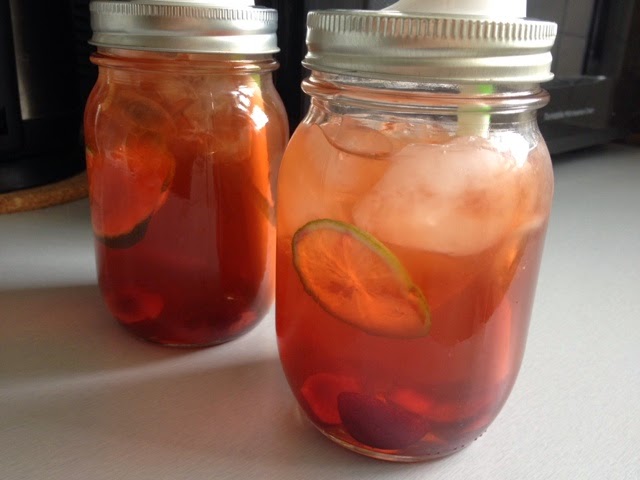
Oh summer- the time when all I drink it seems is water, iced coffee and iced tea.  But I'm picky about my iced tea; I don't like that stuff that comes in a can, or a bottle.  Nope.  Only the home made stuff for me.  And its so easy to make, why wouldn't you make some homemade iced tea.  There are endless ways to make it your own!  I especially like using herbal tea bag, usually fruity.  I find them refreshing.  But I have used regular ol' black tea and its turned out nice too.  This formula, I guess, is for my current favorite iced tea.  Its refreshing, not too sweet, and caffine-free so you can sip it into those hot summer nights.


You need the basic iced tea materials: A kettle (or a pot and stove), a heat-proof pitcher (I got this Le Crueset one from Winners for 15 bucks!) and some tea bags.  I'm into the herbal berry teas byCelestial  Seasonings, but my absolute favorite is the Very Berry tea from Clipper Teas.  I just ran out when I was making this pitcher.  It turned out really nice too.  Not pictured it the sweetener you want to use.  I use honey most of the time.  You can use a wet or dry sweetener, it doesn't matter.  

Ingredients:

4 tea bags, any kind
3 cups boiling water
2 tbsp sweetener (or more or less according to your own taste)
4-5 cups cold water
Ice to serve
Any garnishes that you want, I used limes and cherries

Method:

1) Boil your water in a kettle or on the stove. 

2) In your pitcher or another heatproof container, steep your tea bags in the water for 15-20 minutes.

3) After you have steeped the tea, you will have a concentrated tea base for your iced tea.  While the tea is still hot, add you sweetener, and stir well.  Make sure that your sweetener is melted, dissolved and incorporated into the base.  

4) Taste.  You want it to be sweeter than you want the finished tea to be because you will be dilouting the tea with water and ice.

5) Add cold water to the tea.  Start with 4 cups and keep increasing until you have the strength of tea desired.  I like pretty strong tea, so I don't add the full 5 cups.  

6) Stir well, and that's it!  Serve in glasses filled with ice and any garnish!  Sip and feel Southern!


We like to sit outside and read and talk while sipping iced tea.  Its a pretty Southern thing to do.  Can we take a minute to look at the cool lids I found for mason jars??!:


They are made by Ball, and they were super cheap.  I got 4 lids and 4 reusable plastic straws for 2 bucks!  They were great for keeping the bees and wasps away.  If you don't have the time to make your own, these are a great buy.  You can use them without the straws, that is my favorite part about these lids.  

Enjoy!  


Tuesday, 5 August 2014

Made: Kimono Cardigan


Whoa! Two posts in the same week?  This is a record for me.  Yay me!

ANYWAYS, I finally fell in love with this "kimono" cardigan trend.  (I do hate that its called a "Kimono" cardigan, seems a little appropriative to me, but I digress...)  I like the flowy, comfortable feeling of them.  But by the time I wanted to buy one, they were no where to be found!  This made me really sad.  But then I remembered that I was sort of crafty, so I thought I would make one myself!


It was pretty easy to make this jacket.  And the fabric I bought was only 3 bucks a metre!  So this cost me a total of 7 dollars to make.  And since these babies sell for almost 40 dollars, I got to make something and have a deal!  Which is awesome!  If you can sew a straight line, you can make on too.  For the easiest way to make one, choose a fabric that wont fray when you cut it for the easiest construction, then you won't have to hem any of the ends!  My fabric needed to be hemmed which was what took most of the time in making it.  Of course, I forgot to take pictures, so here is the basic run down of how I made this with my basic tutorial made in Skitch:


Not bad for 2 hours work.  It is a little warm though, so I will probably wear this more in the fall.  I'm thinking of making another one in silk/ cotton to wear now... But I'm not sure how much use I will get out of it.  Summer is almost over :-(


::Top to Bottom::
Kimono Cardigan- Made by me!
Necklace: Pyrrha from Pure Home Couture
T-shirt- Old Navy
Jeans- Torrid
Sandals- Birkenstocks

If you make one, I would like to see it!  Link it in the comments! 

Saturday, 2 August 2014

Bringing it back: The Lady Hankie


Summer is in full force now and it is getting humid y'all.  And with the heat and the humidity, comes sweat.  Didn't see that one coming did you?  Well, today I'm talking all about sweat.  I do it.  You do it. Your grandmother does it too.  We all sweat.  Its natural.  Being from a Southern (U.S.) family, I think its perfectly normal too be sweaty in the summer.  But the Northern people-- oh the North!  Here people do everything and anything to look like they are not sweating.  So weird.  Its hot, just be sweaty!  

When I was younger, all the adults I knew in the South always had a small towel or something with them on hot days.  It would be draped over their shoulder or in a pocket, but it was there.  My daddy still does this.  And I love it.  He is unapologically sweaty.  He always has his cloth to wipe his brow.  And I love that.  

In the summer, I had a habit of having a paper towel or something in my bag for if I got really sweaty.  I would clandestinely wipe my brow or upper lip when no one was looking.  I was a sweat apologist.  Keeping it secret.  Keeping it quiet.  But I'm older and wiser now; and somewhat sweatier.  So while I was with my friend Kate on an antiquing mission, I bought a bunch of vintage handkerchiefs.  I didn't know exactly why I bought them, but my heart had a plan.  

As we walked around the village of Waterford, I began to sweat.  Then I remembered that my Gramma had a hanky that she used to wipe her brow in her hot ass kitchen.  So I pulled out my hankie and right on the street mopped my sweaty brow.  

It felt glorious.

I can't reccomend it enough.  Get a pretty hankie.  Go outside.  And when you get sweaty, don't apologize.  Just pull out your beautiful cloth and pat yourself.  Free yourself from the cult of dryness that is unnatural.  Be proud.  Be sweaty.  And bring back the lady hankie!